Systems up or down


Working From Home

IMPORTANT NOTICE:

While you are working from home you need to maintain the security and privacy of the University’s data by ensuring that no-one else in your household (or visitors to your household) can access or view University data.

Please review the IT Security information below to ensure you are keeping UniSA data and resources safe.

Getting started:

Forward all calls:

  1. Click Call settings (bottom left corner)
  2. The pop out menu will allow you to quickly forward your calls to a listed number or Voicemail.
    NOTE: See Call Preferences (above) or the Call Preferences page (including screen shots) for additional options.

Receive calls:

  1. Click Call settings (bottom left corner)
  2. Change dropdown box to Do Not Forward Calls to stop forwarding your calls.


Or for step-by-step instructions (including screenshots) see the divert or forward calls page.

You will need to know this for a number of reasons e.g seeking IT Help Desk assistance, software installations etc:

  1. Bottom left corner type PC in Type here to search
  2. Click View your PC name or About your PC
  3. Device name under Device specifications is your computer name
    Example: ITU123456

You will need to know the Full Path of any Shared Drives you access e.g Teams/Staff-*/Research etc

    1. Open File Explorer > make note of information in the brackets to the left of the drive letter and immediately on the left.
      Example information from below to make note of:
      1) \\groups.rsfs.unisa.edu.au\groups
      2) \\staff.rsfs.unisa.edu.au\staff-h\user name>
      2) \\udfs.unisa.edu.au\teams
      3) \\udfs.unisa.edu.au\staff-h\<user name>

If you frequently access websites such as SharePoint we strongly advise you to save them in your Staff Portal:

  1. Log into Staff Portal
  2. Click the settings cog on the right-hand side or Add/Edit My Links at the bottom of My Links
  3. Enter desired URL
  4. Enter Description
  5. Click ADD LINK

For step-by-step instructions (including screen shots) see creating a Staff Portal my Links page.


NOTE: If you forget to create these you will need to speak to a colleague.  IT Help Desk does not have a list of websites people access.

Preparing your home computer:

Ensure your Operating system is up to date.

Microsoft:

Click on the Start menu and type 'Windows update'. Click on 'Check for updates'

Apple:

Open the Apple menu select 'About this mac' and 'Software update'.

Microsoft:

Windows 10/11 has it’s own anti-virus software, Windows Defender. This should be enabled if you are not using any other free or commercial anti-virus software.

Apple:

The macOS is vulnerable to trojans and ransomware. To protect your computer antivirus software is recommended, such as Avast Security for Mac.

Windows or macOS:

Panopto Recorder can be downloaded and installed directly through Panopto
For step-by-step instructions (including screens shots) see the install Panopto Recorder page.

The software can be downloaded and installed directly onto your device through the Webex site.

Windows or macOS:

On personal devices you can install Microsoft Teams by going to https://teams.microsoft.com/downloads

See AskIT FAQ on how to use Teams

Windows or macOS:

Zoom Client and other options can be downloaded through Zooms download center.

Windows or macOS:

  1. Go to: portal.office.com
    NOTE:
    You will be asked to log in with your UniSA email address and password.
  2. Click Install Office

For step-by-step instructions (including screenshots) see the installing Office365 page.

Windows or macOS:

  1. Sign into Adobe CC.
  2. Click Install/Update for the desired App.
  3. If prompted, click Continue on Welcome to Creative Cloud.
  4. Progression of App installation/update will be shown.
    NOTE : Multiple installs/updates can be selected at one time, but the installation/upgrades happen one at a time and additional Apps are queued.
  5. Once completed, you can Open the App through the Adobe Creative Cloud or shortcut on desktop.
  6. Close the Adobe Creative Cloud window.
    NOTE : Installations/upgrades will continue to run in the background.

For step-by-step instructions (including screenshots) see install/update Adobe Creative Cloud Apps page.

Windows:

  1. Connect to VPN
  2. Through the Control Panel and click on Mail
  3. Click E-mail Accounts...
  4. Click New
  5. Leave E-mail Account selected and click Next
  6. On the Auto Account Setup page enter the required details:
    • Your Name: <First name> <Last name>
    • Email Address: <firstname>.<lastname>@unisa.edu.au
    • Password: <your UniSA password>
    • Retype Password: <your UniSA password>
  7. Click Next
    NOTE:
    If a pop-up box appears asking for your login details again make sure you select Another account and then enter uninet\<username> and <your UniSA password>.
  8. On the Microsoft Outlook pop-up regarding Allowing https://autodiscover.unisa.edu.au/autodiscover/autodiscover.xml tick Don't ask me about this website again and click Allow
  9. Outlook will go through Configuration checks. On successful completion click Finish.
  10. Close all windows and open Outlook

NOTE: To use Outlook in the future you will need to connect to the VPN first, give the PC a minute or 2 after successful connection and then open Outlook.

macOS:

NOTE: The following steps are for after you have installed Office365 and connected to the UniSA VPN.

  1. Open Outlook
  2. Click Tools menu
  3. Click Accounts
  4. Click +
  5. Click New Account...
  6. Enter your email address
  7. Click Continue
  8. Enter:
    • Username = <unisa username>
    • Password = <unisa password>
  9. Click Sign in
  10. Click Done

For step-by-step instructions (including screenshots) see the adding staff email to Outlook on Mac page.

Windows:

  1. Close Outlook
  2. Go to Control Panel and click Mail.
  3. Click E-mail Accounts.
  4. Click New on next window.
  5. Leave Office 365 selected and enter the Shared Mailboxes email address.
  6. Click Next.
  7. Tick Don't ask me about this website again on Microsoft Outlook pop-up and click Allow.
  8. Congratulations message will appear, click Finish.
  9. Close all windows and open Outlook.

Step-by-step instructions (including screen shots) can be found on the Opening a Shared Mailbox in Outlook so sent items will go to that mailboxes sent items page.

macOS:

NOTE: The following steps are for after you have installed Office365 and connected to the UniSA VPN.

  1. Open Outlook
  2. Click Tools menu
  3. Click Accounts
  4. Click +
  5. Click New Account...
  6. Enter the Shared Mailbox email address
  7. Click Continue
  8. Enter:
    • Username = <your individual unisa username>
    • Password = <your individual unisa password>
  9. Click Sign in
  10. Click Done

Step-by-step instructions (including screenshots) see the adding shared mailbox to Outlook on Mac page.

Windows:

  1. Download Windows BigIP Edge Client from access.unisa.edu.au (Unisa login credentials may be required)
  2. Select the Windows Client from the download page
  3. Open BIGIPEdgeClient.exe
    NOTE: Depending on the browser you use it will be available to open in the top right corner. Otherwise, it will be in your downloads folder. The file name will also contain number version information.
  4. Click Next
  5. Click Install
  6. Program will show a progress bar
    NOTE: Your device may advise a software wishes to make changes and confirm if you allow this, click Yes.
  7. Click Finish
  8. Allow your device to run through any available updates etc.
  9. Once successfully installed, f5 will automatically go through the connection process.

For step-by-step instructions (including screenshots) see the install Windows f55 BigIP Edge Client page.

macOS:

  1. Download macOS f5 BigIP Edge Client from access.unisa.edu.au (Unisa login credentials may be required)
  2. Select the Mac Client from the download page
  3. Click Save
  4. Unzip the bigipmacedgeclient.zip folder from the location that you saved it in.
  5. Click mac_edgesvpn.pkg from extracted files
  6. Click Continue
  7. Click Install
    NOTE:
    If prompted enter login details for the device. If a UniSA Blue Plated Mac this will be your UniSA credentials and then click Install Software.
  8. Program will show a progress bar
  9. Click Close when install success is indicated
  10. This is a once off process and you can click Move to Trash if prompted/desire.

For step-by-step instructions (including screenshots) see the install macOS f5 BigIP Edge Client page.


For Windows computers you can use this Chrome break timer. If you are using  Mac you can try Dejal time out.

Preparing your UniSA PC for home use:

Whether this is a Blue Plated laptop or desktop, we recommend:

  1. Be as close as possible to your home router (internet connection)
    NOTE: This is to reduce interference or connection issues. If you experience any, we recommend speaking to your Internet Service Provider (ISP).
  2. Connect via network cable (LAN Cable)
    NOTE: These are commonly known as "blue cables", but come in a variety of colours like blue, gray and even yellow.
    1. If you have taken your desktop home and do not have a LAN Cable you will need to connect a wireless dongle. 

      Please be advised that UniSA will not be providing staff with Wi-Fi dongles.  If you wish to have this capability you will need to source this personally.

The following PDF will assist you with Docking Station to Monitor Connections when at home.

The following PDF will assist you with installing a Wireless USB adapter onto your UniSA computer.

Blue Plated PC:

Panopto Recorder is available through the Software Center.
NOTE: This is only possible if you are on campus or connected via VPN.

Blue Plated macOS:

Panopto Recorder can be downloaded/installed directly through Panopto
Or for step-by-step instructions (including screens shots) see the install Panopto Recorder page.

Preparing yourself:

The PTC website has information on how working remotely can work for you, with useful resources such as tool kits - Your Wellbeing and Development and Managing Your Staff.

Working remotely:

Windows or macOS:

While working off campus you can use Microsoft Teams to keep engaged with colleagues via chat and audio/video calls for meetings.

Install the Teams app on your mobile phone, to make voice over IP calls to your colleagues.

See AskIT FAQ on how to use Teams


Windows or macOS:

Please refer to login options under Install/Login section.

2. Click New Meeting
New Meeting.png

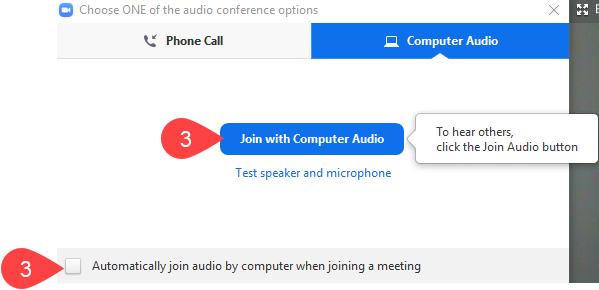
3. Click Join with Computer Audio
NOTE:
You may also wish to tick Automatically join audio by computer when joining a meeting so you arent prompted again.
Join with PC Audio.png

4. Click Invite and select desired method
invite.png

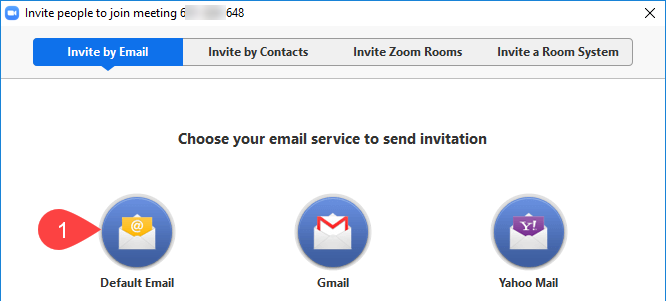
  1. Click Default Email to use Outlook and your UniSA email
    NOTE: You are welcome to use the other listed email options, but they will not be covered in these help pages.
    invite_via_email.png
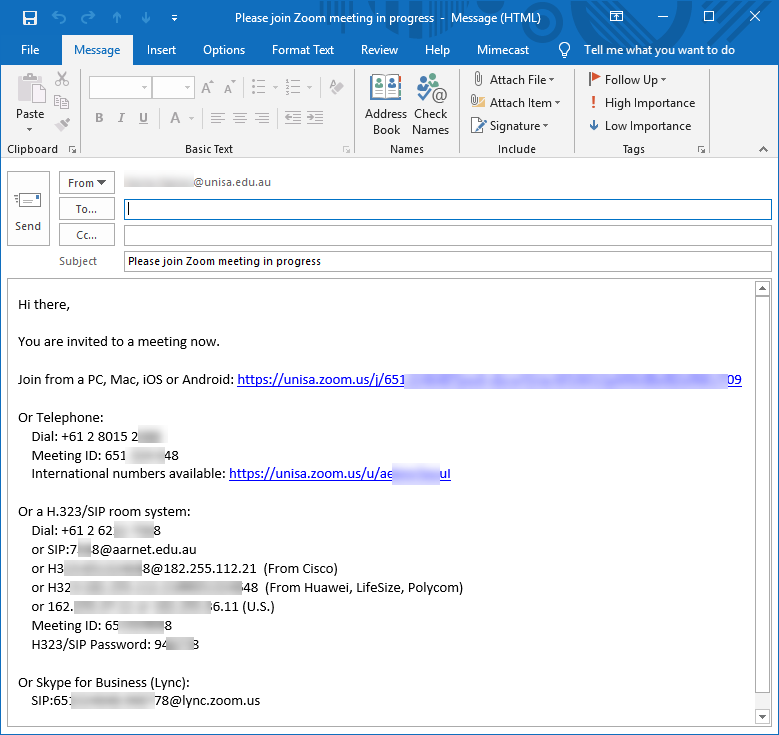
  2. An Outlook email will appear and you simply need to send this to required participants. The email will look similar to:
    email_details.png

5. Wait for Participants to join meeting and then proceed with meeting
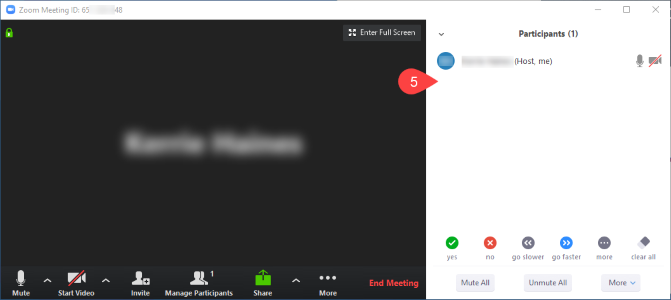
participants.png

Please see the Zoom features section OR refer to section below.
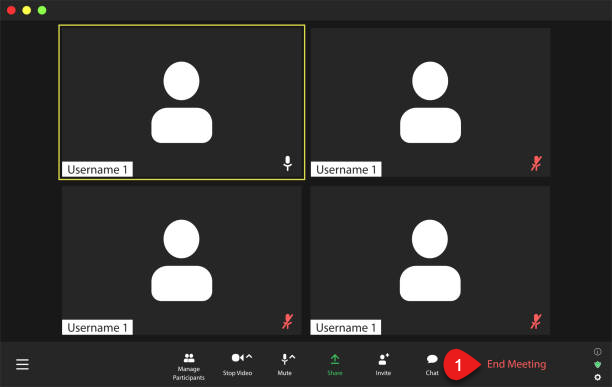
  1. Click End Meeting
    end the zoom meeting.png
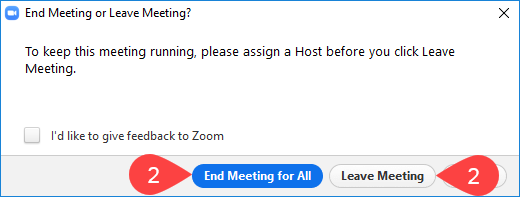
  2. Click either End Meeting for All or Leave Meeting
    leave-meeting.png


Participants method of joining a Zoom meeting differs between course work virtual classroom session(s) and staff work meetings, but regardless of how hosts/participants join, once in a Zoom session the available features are identical. Which is why some of the below options will take you to a learnOnline help resource.


There are a number of options for hosts to share with participants, the most popular/common are:
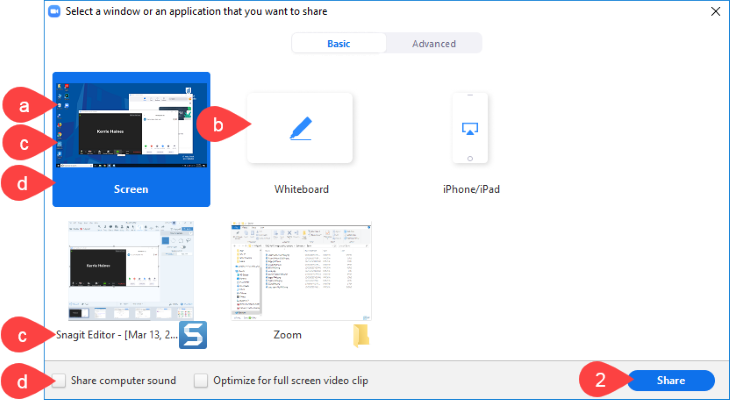
  1. Select what you want to share:
    • a) Screen
    • b) Whiteboard
    • c) Specific software you are running
      NOTE: This can be done through Screen or the software will be listed as an option.
    • d) Youtube video
      NOTE: This option is achieved through sharing your screen, but to enable participants to hear the audio you need to tick Share computer sound.
  2. Click Share
    share-options.png
  1. Click Stop Share
    NOTE: This is how to stop sharing, no matter what you have selected to share.
    Stop-sharing.png

Scheduling privilege is designed for a user or an executive admin to:

  • You can assign or delegate a user or multiple users in your account to schedule meetings on your behalf.
  • You can also schedule meetings on behalf of a user (or multiple users) that has assigned you scheduling privilege. If both users have a webinar license, they can also schedule webinars for you.
  • You and the assigned scheduler must be assigned as Licensed or On-Prem.
  • Users with Scheduling Privilege on your account will be able to manage and act as an alternative host for all meetings.

Steps on how to do this are available through the Zoom scheduling privileges page.

Please refer to Add a Co-Host page.

Did you know that you can delegate other people as alternative hosts in Zoom meetings?

If you have created a Zoom meeting but would like to add others to be capable of hosting the meeting in your absence (or automatically become co-hosts when you are there), then you can do this by adding them as “Alternative Hosts”.

This is especially important if, for instance, they need to record your meeting on your behalf.

To set up an Alternative Host, when scheduling a Zoom meeting follow these steps:

  1. Click Advanced Options.
  2. In the Alternative Host field, enter the alternative name to search through users. You can also enter the alternative host's email address if their name doesn't come up.
  3. Click Schedule to finish and open the calendar you have selected.
  4. The alternative host will now receive an email letting them know that they have been added as an alternative host.

For more information on alternative hosts please click here.

Please refer to the Managing Participants page.

Please refer to the Breakout Rooms page.

Please refer to the Audio in Zoom page.

Information on controlling your meeting and securing its content can be found on the Increase Security in Zoom web page.

The following settings will be default on UniSA Zoom conferences in order to improve security :

  • Participant video is off on meeting startup.
  • Only authenticated users can join a meetings.
  • When scheduling a meeting require a password will apply to everyone.
  • Private chat is disabled.
  • Require a password for Personal Meeting ID (PMI) is enabled.
  • Require a password for Personal Meeting ID (PMI) is enabled.
  • Identify guest participants in meetings is enabled.

More information on Zoom Security can be found here.

An android smartphone can be used as a webcam for your PC by installing an app called 'DroidCam' on your phone. With the app installed and configured you can use it as a webcam for Zoom, Skype for Business and for recording video and audio for Panopto.

Follow these instructions to install and configure the app 'DroidCam' on your smartphone and connect it to your workstation.

Windows or macOS:

  1. Go to portal.office.com
    NOTE : You will be asked to log in with your UniSA email address and password.
  2. Click on the desired software button e.g., Word or Excel.
  3. Commence using the software.


Windows or macOS:

Access to the OWA (Premium and Light versions) is via the Email link within myUniSA or by going directly to https://mail.unisa.edu.au/owa.


Windows or macOS:

NOTE: Internet Explorer 11 or FireFox are the recommended browsers for doing this.

  1. Log into Outlook Web App (OWA)
  2. Click your Profile/Portrait in the top right corner
  3. Click Open another mailbox...
  4. Enter Shared Mailbox name or email address
  5. Click Open
  6. Use OWA to read/reply/send emails through Shared Mailbox 

For step by step instructions (including screenshots) see open Shared Mailbox through Outlook Web App (OWA) page.

Windows:

  1. Connect to the UniSA VPN
  2. Open File Explorer
  3. Click Computer tab
  4. Click Map network drive
  5. Choose Drive letter
    NOTE: The letter selected is only a reference point and can be different on each machine you map the drive.
  6. Enter Folder path as required:
    UDFS

    \\udfs.unisa.edu.au\<SHARE_NAME>

    RSFS User Share \\staff.rsfs.unisa.edu.au\Staff-<USER_LETTER>\<USERNAME>
    RSFS Group Share \\groups.rsfs.unisa.edu.au\$\<GROUP_NAME>
    a. <USER_LETTER> denotes the first letter of your username, e.g., if your username is “smithj”, the <USER_LETTER> would represent the letter “s”.
    b. <USERNAME> denotes your username, e.g., if your username is “smithj”, <USERNAME> would represent “smithj”.
    c. <GROUP_NAME> denotes the research group name, e.g., if the research group is “MyResearchProject”, <GROUP_NAME> would represent “MyResearchProject”.  Please note there is a $ before the <groupname>, e.g. the full path would be “\\groups.rsfs.unisa.edu.au\$\MyResearchProject".
  7. Ensure Reconnect on logon is ticked
    NOTE: You will also have to tick Connect using different credentials and when prompted (after clicking Finish):
    • User name = uninet\<unisa username>
    • Password = <unisa password>
  8. Click Finish

For step-by-step instructions (including screenshots) see Windows 10: mapping a network drive page.

macOS:

  1. Open Finder

  2. Select Go menu

  3. Select Connect to Server...

  4. Enter the Server Address e.g.
    UDFS

    smb://udfs.unisa.edu.au/<SHARE_NAME>

    RSFS User Share smb://staff.rsfs.unisa.edu.au/Staff-<USER_LETTER>/<USERNAME>
    RSFS Group Share smb://groups.rsfs.unisa.edu.au/$/<GROUP_NAME>

    a. <USER_LETTER> denotes the first letter of your username, e.g., if your username is “smithj”, the <USER_LETTER> would represent the letter “s”.
    b. <USERNAME> denotes your username, e.g., if your username is “smithj”, <USERNAME> would represent “smithj”.
    c. <GROUP_NAME> denotes the research group name, e.g., if the research group is “MyResearchProject”, <GROUP_NAME> would represent “MyResearchProject”.  Please note there is a $ before the <groupname>, e.g. the full path would be “smb://groups.rsfs.unisa.edu.au/$/MyResearchProject".

  5. If prompted enter your UniSA <username> and <password>
    NOTE: Depending on the version of macOS you are using you may need to log on as <username>@uninet.unisa.edu.au or just <username>.

  6. Shortcut is now on your desktop

For step-by-step instructions (including screenshots) see Mac: mapping a network drive page.

Windows or macOS:

Uploading files:

  1. Login to portal.office.com
  2. Click OneDrive
  3. Click Upload
  4. Click Files
  5. Locate desired file and click Open
  6. OneDrive will indicate its uploading progress
  7. OneDrive will indicate when completed

Or for step by step instructions (including screenshots) see upload file(s) page.


Share files immediately after uploading:

  1. Upload a file
  2. Click Share Link
  3. Click People you specify can edit if you don't want people to be able to edit else jump to Step 6
  4. Untick Allow editing
  5. Click Apply
  6. Enter email address of desired person and hit Enter or click Search Result
  7. Enter additional email address(es) or personal message if desired
  8. Click Send

For step by step instructions (including screenshots) see sharing file immediately after successfully uploading page. 


Sharing a file you previously uploaded:

  1. Click desired file/folder
  2. Click desired Share menu option:
    • 2A) Share (appears when mouse hovers over file/folder, to the right of the files name)
    • 2B) Select file/folder and then Share (on Tool bar at top of browser)
    • 2C) Click Action (3 dots) menu and then Share (to the right of the files name)
  3. Click People you specify can edit if you don't want people to be able to edit else jump to Step 5
  4. Untick Allow editing
  5. Click Apply
  6. Enter email address of desired person and hit Enter or click Search Result
  7. Enter additional email address(es) or personal message if desired
  8. Click Send

For step by step instructions (including screenshots) see share a previously uploaded file page.


Further information on how to utilise OneDrive can be found in the upload and sharing section or downloading section.

Windows or macOS: Check your Personal Portal


Login:

  1. Click Login button above
  2. Enter your UniSA <email address>
  3. Click Next
    NOTE:
    You will now be redirected to a University federated login page.
  4. Please enter your:
    • <username> or <email address>; and
    • <Password>
  5. Click Sign In
    NOTE: You will notice that the Login page bounces back to Mimecast, that’s ok it will only take a moment and then log you in automatically.


Check for Rejected emails:

You can view Bounced and Rejected Messages at any time using the Personal Portal. 

After logging into the Mimecast Personal Portal click on Rejected Messages or Bounced Messages from the left hand menu.

These are messages have been sent to your email address that has been rejected or bounced because of the content or problems with the sending email servers. These generally applies to inbound emails.  

The rejection or bounce viewer can be used to display information about why it was rejected it. If the message was legitimate, you can use this information to address the cause of the rejection or bounce.


Blocking Senders/Domains:

  1. Click Login button above
  2. Click Blocked
  3. Click Add Blocked
  4. Enter desired email address or entire domain. Example:
    • Email: someone@domain.com
    • Domain: domain.com
      NOTE: Blocking entire domains runs the risk of not receiving legitimate emails from people using that domain. So the preferred method is email blocking.
  5. Click Add
  6. Click Block

NOTE: If you need to alter the Blocked list you can either use the Permit button (which moves the listing to the Permitted Senders list) or the Remove button which simply removes the block.


Permitting Senders/Domains:

  1. Click Login button above
  2. Click Permitted
  3. Click Add Permitted
  4. Enter desired email address or entire domain. Example:
    • Email: someone@domain.com
    • Domain: domain.com
  5. Click Add
  6. Click Permit

NOTE: If you need to change the Permission you can either use the Block button (which moves the listing to the Blocked Senders list) or the Remove button which simply removes the listing from the Permitted list.

Windows:

  1. Click up arrow, far right of Taskbar (near clock and calendar) to display more system tray items
  2. Click f5
  3. Click Connect
  4. You will be taken to the UniSA Federation page, where you need to enter your username and password.
    NOTE: Depending on the browser you use, it might populate the Username field with your email address for you from step 3 - thats ok, you just need to enter your Password.
  5. The Okta Multifactor Authentication page will appear, click the Send Code or Push Notification button, enter code and click Verify.
  6. After verifying through MFA successfully, the browser will advise when its OK to close the tab.
    NOTE: Depending on your device/browser, you may only be prompted to do Steps 3-5 once and upon connecting in the future you just need to wait for your browser to show sign in completed.
  7. The Big-IP Client app will run through the initializing and once completed will minimize itself. The icon (bottom right corner of the screen, near the date/time) will flash red and once connected successfully will be a solid red icon.

For step by step instructions (including screenshots) see the connecting to UniSA VPN page.

macOS:

  1. Download macOS f5 BigIP Edge Client from access.unisa.edu.au (Unisa login credentials may be required)
  2. Select the Mac Client from the download page
  3. Click Save
  4. Unzip the bigipmacedgeclient.zip folder from the location that you saved it in.
  5. Click mac_edgesvpn.pkg from extracted files
  6. Click Continue
  7. Click Install
    NOTE:
    If prompted enter login details for the device. If a UniSA Blue Plated Mac this will be your UniSA credentials and then click Install Software.
  8. Program will show a progress bar
  9. Click Close when install success is indicated
  10. This is a once off process and you can click Move to Trash if prompted/desire.

For step-by-step instructions (including screenshots) see the install macOS f5 BigIP Edge Client page.


When finished using, remember to Disconnect from the VPN:

Windows:

  1. Click up arrow, far right of Taskbar (near clock and calendar) to display more system tray items
  2. Click f5
  3. Click Disconnect

For step by step instructions (including screenshots) see the disconnecting from UniSA VPN page.

Mac:

  1. Click on the VPN Shield icon in the top menu bar
  2. Click either Turn VPN Off or Quit BIG-IP Edge Client

For step by step instructions (including screenshots) see the disconnecting from UniSA VPN page.

Windows:

  1. Click up arrow, far right of Taskbar (near clock and calendar) to display more system tray items
  2. Click f5
  3. Click Disconnect

For step by step instructions (including screenshots) see the disconnecting from UniSA VPN page.

macOS:

  1. Click on the VPN Shield icon in the top menu bar
  2. Click either Turn VPN Off or Quit BIG-IP Edge Client

For step by step instructions (including screenshots) see the disconnecting from UniSA VPN page.


Working At Home Recommended Equipment:

The following will provide hardware recommendations for UniSA staff to facilitate working from home using a university supplied laptop.


Monitors

The university supplied laptop will have a HDMI port capable of connecting to a HDMI compatible monitor. Once the monitor is connected to the laptop, adjustments to the display settings will be needed.  To extend your desktop follow these steps by left clicking on the desktop >> Display Settings >> Scroll down to Multiple displays >> choose “extend desktop to this display” then moving the monitors under the “Rearrange your displays” area. If the monitor is not detected, please make sure you have selected HDMI as input in the menu function of the monitor.

USB Devices

The university supplied laptop has 1 or 2 USB ports (dependant on model) on the side of the device – these can be used to run a wired keyboard. If the keyboard supports it, connect the wired mouse to the USB port on the back of the keyboard. The other USB port can be used for a USB headset. Alternatively, you can connect a mouse only and use the inbuilt keyboard on the laptop.

Video and Audio

The university supplied laptop will have inbuilt speakers and microphone for use in Webex, Zoom, Teams and any other video conferencing software. For video calls, you can use the integrated camera (on the inside of the lid).

Equipment at Home

The university does not purchase equipment for working at home. Docks for exclusive use at home should be purchased via Dell. If you have a Dell Model 54xx or 74xx Laptop we recommend (at a minimum) the D3100 Port Replicator. If you do have any questions a service call can be raised to check what equipment you have and what is recommended for your personal experience.

Dell P2422HE USB-C Hub Monitor

Purchase of a Dell P2422HE USB-C Hub Monitor (24” screen) is required for this set up (option to upscale to P2722HE – 27” screen)
Dell P2422HE USB-C Hub Monitor

The university supplied laptop can connect to the 24” monitor using the USB-C port (port 7 on the diagram above). This device gives 4 additional USB ports, to allow for the use of addition peripherals such as wired keyboard, mouse, headset and webcam, with 1 to 2 USB ports (dependent on model) remaining on the laptop to be used for thumb drives or related USB devices. The USB-C cable will also provide charge for your laptop whilst connected (65w).

The monitor can support a 2nd screen using a HDMI cable (port 3 on diagram) or a DisplayPort cable (port 6 on diagram).

OR

D3100 USB 3.0 Port Replicator

Purchase of a Dell D3100 USB 3.0 Port Replicator is required for this set up.
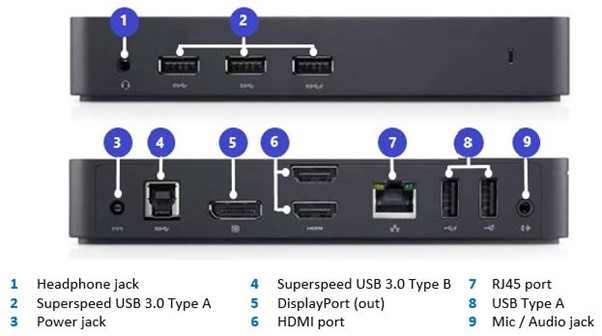
Dell D3100 USB 3.0 Port Replicator

The university supplied laptop can connect to the D3100 dock using the supplied USB cable (Type A). This device gives 5 additional USB ports, to allow for the use of addition peripherals such as wired keyboard, mouse, headset and webcam. This dock does NOT provide charge to the laptop.

The device can be used to connect to external screens using the DisplayPort (port 5 on the diagram above) and/or HDMI (port 6 on the diagram above) ports.

To purchase:

The university will not purchase these items for you to use at home. It is expected that the user will purchase privately. This can be done via the dell website (Link will open in new window - www.dell.com/en-au). Please see here for more information on Personal Hardware Purchasing (Link will open in new window - Personal Purchases)

Dell U2422HE 24” USB-C Hub Monitor

Purchase of a Dell U2422HE 24” USB-C Hub Monitor is required for this set up.

Dell U2422HE 24” USB-C Hub Monitor

The university supplied laptop can connect to the 24” Ultrasharp monitor using the USB-C port (port 6 on the diagram above). This gives you 4 additional super speed 10Gbps USB ports, to allow for the use of addition peripherals such as wired keyboard, mouse, headset and webcam, and leaves you with 1 to 2 USB ports (dependent on model) on the laptop to be used for thumbdrives or related USB devices. The USB-C cable will also provide charge for your laptop whilst connected (90w), plus another USB-C port for data only.

The monitor can also support a 2nd screen using a HDMI cable (port 3 on diagram) or a DisplayPort cable (port 7 on diagram).

OR

Dell U2722DE 27” USB-C Hub Monitor

Purchase of a Dell U2722DE 27” USB-C Hub Monitor is required for this set up

The university supplied laptop can connect to the 27” QHD monitor using the USB-C Port (port 5 on the diagram above). This gives you 4 additional super speed 10Gbps USB ports, allowing you to use wired keyboard, mouse, headset and webcam, and leaves you with 1 to 2 USB ports (dependent on model) on the laptop to be used for thumbdrives or related USB devices. The USB-C cable will also provide charge for your laptop whilst connected (90w), plus another 2 USB-C ports for data only.

The monitor can also support a 2nd screen using a HDMI cable (port 3 on diagram) or a DisplayPort cable (port 6 on diagram).

To purchase:

The university will not purchase these items for you to use at home. It is expected that the user will purchase privately. This can be done via the dell website (Link will open in new window - www.dell.com/en-au). Please see here for more information on Personal Hardware Purchasing (Link will open in new window - Personal Purchases)

Teaching remotely:

  • You can register for Zoom and Panopto workshops on the Enhanced TIU Support.
  • Staff can book a virtual consultation session with an Online Educational Designer (OED). The booking times are for 25 min, with an option to arrange an additional session if required. The virtual consultations will be available everyday (Mon-Fri) from 8:30am – 4:30pm. These will be delivered via learnonline and booked by following the link on the TIU website
  • The Library can continue to provide help sourcing online resources such as etextbooks, ereadings and multi-media to support your course as well as provide advice around copyright and eReserve. For assistance contact asklibrary@unisa.edu.au or call 1300 137 659.

The following will assist you to/with:

The following will assist you with making them available to students:

This can be done through Panopto Recorder.

Other helpful pages can be found on the learnOnline Staff Help Panopto section.

The following will assist you with editing a Lecture Recording.

The following will assist you to embed a Video or Folder on your course site.

The following will assist you to embed readings into your course.

IT security

Always lock your computer when you step away from your computer and log off when you are no longer working.

Microsoft:

Press the Window key and L to lock your screen

Apple:

Press Command + Control + Q keys to lock your screen


On your home computer

  • Create your own profile on your home computer for your UniSA work and do not allow family members to use this profile
  • Password protect your profile on your home computer and do not share your password with anyone else
  • Do not use your UniSA password as your password on your home computer 


Make sure you have a secure Wi-Fi connection.

To do this you need a strong password, as well as a strong security level on your router (modem).

Most Wi-Fi routers are correctly secured with WPA2 (Wi-Fi Protected Access 2), which is a method for securing your Wi-Fi network at home so that no one can access your information.


Depending on their data classification (see section 4.7 of the information security policy) files can be stored on UniSA approved cloud services such as One Drive, SharePoint, or server shares.

Files should not be stored locally on your computer or a USB drive.

Further information is available on our Protect your data .

Your UniSA computer is for your use only. Make sure that friends and family understand this and that they should not have access to this device.