For all information related to the new Adelaide University — including study applications for 2026, details for commencing and current students, and Graduate Research — please visit adelaideuni.edu.au.

Zoom is a video communication tool which can be used for a variety of purposes.
You may wish to consult the following guides for further suggestions on how to use Zoom to facilitate learning in your courses:
It can be used for:
Zoom is NOT recommended for live lectures. We recommend you use Panopto.
TIU has developed extensive help resources to get you started with Zoom and these include hardware requirements such as headsets, webcam and Zoom meeting configuration. The below resources will assist you:
You will need to download the Zoom application and login using the details below to authenticate your account.
Zoom is available for download for UniSA blue plated computers and your personal devices (PC/Mac).
Please make sure to configure your settings for video and audio and select correct devices for the Zoom meeting. Please see the help link: https://lo.unisa.edu.au/mod/page/view.php?id=1815874
Please watch this video which works through how to add a Zoom session to your learnonline course site. Alternatively, there is also a quick guide staff help page.
If tutors want to create their own Zoom tutorial , they will need to login to their Zoom portal either by following this link, or by opening their Zoom desktop application. Then follow the instructions on the staff help page for scheduling a meeting.
Note: Course Coordinators should be adding Zoom tutorial sessions in their learnonline course sites.
If you set up the Zoom session in learnonline the students will be able to access the link on the course page. However, you may want to send all students a message via your news forum outlining how to access the session or add the link to take them directly there. You can also copy the Zoom invitation and send it via email. Instructions for how to do this are on the staff help page.
Zoom is best used for interaction and engagement (such as Q&A, live student presentations etc) and should not be to replace presentations that can be recorded by other means (such as Panopto). Purpose recorded presentations are more likely to be re-usable in future offerings and have a longer shelf life without the issue of obtaining participant permissions to re-use, or trying to edit out participants after the fact.
Recording a Zoom session, or portion of a session, to add to your course site is useful where there is information being shared that is specific to a course offering or project task, is time sensitive (eg Q&A for an assessment or collaborative project task that will benefit students who were unable to attend). These recordings would typically only be made available to the students in the course site for the offering in which they are recorded.
If you think your session fits these requirements, you can record your by clicking on ‘Record’ at the bottom of the meeting screen. There are further instructions on recording a Zoom session on this page.
The host/scheduler of the meeting can record, if you plan to record follow the below instruction:
Note: If you upload the recording to Panopto, you can edit any parts you don’t want before adding to your course site.
We recommend you record to your computer, then upload into Panopto and share to learnonline. Recording will be saved to a Zoom folder on your computer which is auto created when you install Zoom. You get 2 versions, audio (MP3) only and AV (MP4) - upload the MP4 version.
No. Unfortunately sometimes your tutors won’t have editing access in your course. As the course coordinator you can either:
The person you are trying to add as an alternative host first needs to associate their staff account by signing in at unisa.zoom.us. Once they have done this, you will be able to add them as an alternate host.
Actually, you don’t. Zoom’s main feature is dynamic sharing of content rather than burdening the system with uploading files. See the ‘Share’ help resource.
You can share files through the Chat function if it's enabled.
Yes, but reports of this nature are only available if you are the host of the meeting. To find out how to get a record of attendance, visit the staff help page.
You can but it is not recommended. Zoom is useful for providing a space for teacher and student interactions. As lectures are mostly for the delivery of information, it is recommended that you use Panopto to record and store your lecture presentations. To learn more about recording with Panopto visit the staff help page.
There is support for students using Zoom on the learnononline Help course site. From there, students can also download a PDF quick guide.
To maintain a good sound quality for students, it is highly recommended that you use a headset when using Zoom. However, if you are unable to access a headset, you should be ok to use the inbuilt microphone/speakers of your computer.
You cannot host two Zoom meetings at the same time. Also, an alternative host cannot run the meeting in the course site if the host is running a meeting at the same time anywhere else. Therefore, the tutor should set up their own meeting in the Zoom portal or alternatively, the course coordinator sets up the meeting at a different time and adds the tutor as an alternative host.
To learn more about the roles in Zoom you can visit the staff help page.
It may have to do with the way you finished the first session. Closing the window, or killing the session, may not send the right signal to the Zoom server. There will be a link in your Zoom session screen that says, "End meeting" and then, if you are the host, there is an extra window that appears and says "End meeting for all" which you need to select. With this, Zoom formally terminates the session and you should be able to start your next session.
It is important to note that, as a host, you cannot run two sessions concurrently. Therefore, you must formally finish one before starting another.
If the session was setup by someone else, they may have another session in progress.
See the learnonline resource on customising security for your context. Consider turning off features like private chat or annotation if they are not required.
There are Zoom support resources available on the learnonline Staff Help site. If you have specific unanswered questions, you could book an OED consult here.
For technical questions contact the HelpDesk: ithelpdesk@unisa.edu.au
As the host of the session you can manage the participants. You can choose to allow, or not allow, your participants to use video, audio and chat. For more information on how to manage your participants visit the Zoom help page.
You can share your screen by clicking on the ‘Share Screen’ icon at the bottom of the meeting. For more information on sharing your screen and managing your participants ability to share their screen, visit the staff help page or the Zoom support page.
There are 3 video layouts to choose from. To learn more about each of them visit the staff support page.
Breakout rooms are a way of grouping participants within your Zoom session. This can be useful for establishing smaller discussion groups. For more information on Zoom breakout rooms visit the staff support page.
Whiteboard
Students can use the whiteboard feature. At the end of the breakout session the student who created the whiteboard can save it to their computer (defaults as a png image).
When all students have returned to the main room you can call upon the student to then share their saved whiteboard image.
Chat
Students can only see the chat for their breakout room so they could use this to collaborate. Have the spokesperson save the chat to their computer before the breakout rooms end so they can have it as notes.
Word, Excel, PDF etc
You could upload a file in the chat before launching the breakout rooms. In each room a student downloads the file and screen shares then the group annotate the file. Spokesperson saves the file to share back in the main room.
Yes you can. To find out more about using annotation tools visit the Zoom support page.
Not recommended. You can only have one Zoom session running at a time. UniSA students have access to create their own Zoom session with peers, more information available online.
Once you open the zoom session you will see the Poll function in the bottom menu. You can only create quick on-the-fly type polls in session.
Full details available online with Zoom.
If your tutors have arranged the Zoom session from their account, the recording will be attached to them. They may have saved the recording to their computer or they may have saved it to the cloud. Ask your tutors to upload the recorded version to their Panopto account. To share it with you, they will need to change the ‘Share’ settings of the video to ‘Unlisted’. Within the share settings they can copy the link to the video and send it to you.
Note: If your tutor was the alternative host to the Zoom session, the recording will have saved to the hosts account. To find out more, please visit this staff help page.
An android smartphone can be used as a webcam for your PC by installing an app called 'DroidCam' on your phone. With the app installed and configured you can use it as a webcam for Zoom, Skype for Business and for recording video and audio for Panopto. Follow these instructions to install and configure the app 'DroidCam' on your smartphone and connect it to your workstation.
Edit the Zoom activity in Moodle and add the tutor as alternative host,
AND
Make sure the course coordinator is not having their own Zoom session at the same time.
Tell students your plan at the beginning, e.g. If the session drops out, wait 2 mins whilst I try to reconnect. If this still doesn’t work I will email/post in the forum what to do next.
There are several possibilities that can cause this:
Enable Mirror Effect in video settings.
There are a range of keyboard shortcuts in Zoom, If you accidentally action the Hide Floating Meeting Controls in a Shared view don’t panic, just use the Escape key on your keyboard and the controls will return.
Pause the video & stop sharing. Select Share again but this time select the Share computer sound box in the bottom left of the share window. Proceed and restart the video. See Zoom help.
Use the page controls in the bottom-right corner of the whiteboard to create new pages and switch between pages.

For more serious concerns, you can close a meeting at any point. There are also a range of settings available to increase the visibility of participants and control who attends a session, see the help resource. Please report any external access to the IT HelpDesk.
If there is a need to remove a participant from a Zoom meeting, simply follow these steps:
Note: The below options remove some interaction that students or participants have, depending on your use-case, these might not always be desirable.
Select the Share icon/Advanced, then select Content from 2nd camera. This is an example of someone doing this:
Try to post things to learnonline at the same time each week. For example:
Monday morning
Scheduled lecture time
Some different ideas are:
For example ITEE have this remote electronics labs https://www.multisim.com/
Don’t be afraid of the silence. Give students time to think about your question/prompt. Perhaps have a power point slide with “thinking time” or a clock image open on your computer that you can quickly share to indicate this is “thinking time”.
Looking to build some interactivity into your zoom sessions? We have some ideas, ranging from the simple, but effective, to the more adventurous. These ideas let your students play a more active role as we know this can enhance their learning and increase peer-to-peer engagement.
Let’s start with some guiding principles.
Add a question to the chat before students arrive linked to the current week/topic. Think “Before we start, share your most interesting insight/biggest challenge from ….”, or something like “If there is one thing you want me to cover again what would it be?”.
Then thank everyone for sharing and debrief based on their responses.
Share a power point slide with an emotive image but no words. Ask them to think about it from some perspective. Give them time to think about it. Then start a sharing whiteboard and invite students to simply add words that reflect their thoughts. Again, debrief afterwards.
Students prepare a presentation and deliver this during the session. Make sure they keep it short, around 5 minutes, and encourage the class to ask questions afterwards.
Break-out rooms – they’re a hit! They can resemble the small group discussions typical in classroom tutorials with students often being more active in these smaller groups. Remember to set them a task first, including what you expect after the break-out groups finish.
A guest speaker is possibly easier in a virtual classroom because the world is unlimited. Always wanted your students to hear from that renowned expert in London? Well at least with some good-will around time zone differences. But don’t make it like a lecture; instead interview your guest and have students add their own questions to the chat.
Students will need to have a split screen for this but it’s not too hard. Make a padlet with a task for students to respond to – perhaps post an article, an image or have a debate. This takes place in padlet in real time. The trick here is you are also ‘live-streaming’ the padlet by sharing it through the zoom. It turns an asynchronous activity (the padlet) into a live bulletin board.
You could do the same with any shared file like google docs or a mind map.
Each student (or pair of students) chooses one learning outcome and gives a 5 minute talk on what they have learned and why they thought it important to share. Set the task a week before and have them submit a couple of written paragraphs to you before the zoom session. Explain this will ensure everyone’s original thoughts are captured before they hear from everyone else.
Create a poll with a list of possible actions you expect students should do between now and the next session, or assessment etc. The options are contextual to your course but could include doing the practice quiz, begin the essay plan, summarise the reading etc.
Ask students to respond with what they think they are most likely to do and then share the results, concluding with some words of advice.
https://learningsolutionsmag.com/articles/video-conferencing-with-zoom-online-course-tips-ideas
We found this table (Finkelstein, 2006) irresistible for its analogy and for its ideas.
Table 5.1. Being a "Good Host" in Synchronous Sessions |
|
|---|---|
|
Dinner Party Axiom |
Live Online Learning Guidance |
|
Prepare for your guests' arrival |
Have the resources that you plan to use ready in advance so that you can begin on time. When learners arrive, you want to be able to focus on them and on the content and collaboration at hand. |
|
Welcome guests warmly |
As people login, welcome each person by name if possible. In addition to being a warm way to begin, it sets a tone and reminds learners that you know they are present and that their participation will be expected. |
|
Frequently assess the mood in the room; don't wait until the end to ask guests if they need anything |
Periodically gauge comprehension and mood by asking quick poll questions, soliciting emoticon use, or cold-calling on learners for feedback. Waiting until the last few minutes leaves lithe opportunity for adjustment. |
|
Have more food (for thought) than you need |
Prepare more activities than you think are needed for the time allotted. It is better to have a few planned activities left over for next time than to be short of things to do together as a group, thereby causing learners to question why they needed to carve the same hour out of their day. |
|
Make everyone feel included |
Try to recognize and solicit contributions from as many participants as possible, and refer to comments made by the name of the person who shared them. This is even more important online than offline, where multiple voices can be heard at once and some can be lost in the mix. |
|
Facilitate connections and conversation, but don't dominate every discussion |
Use your role as facilitator to foster an environment where learners are exchanging ideas with others, and seeing their peers as resources for ongoing learning. If a lecture is needed, consider recording it and posting it to a course site for anytime viewing rather than doing it live. |
|
Offer guests something to take home with them |
In combination with a transcript or recording of a live online session, post handouts, slides, or the results of group activities as on-demand resources within a course site. These convenient take-aways help reinforce new knowledge constructed or shared during the experience. |
|
Know when to say good night; leave everyone wanting more |
End on a high point. Don't cram too much into a live session or preside over unnecessarily long goodbyes. If a session peters out, participant attention will diminish quickly and goodwill can suffer. Conclude at a high-energy level to propel learners to do their follow-up work and keep them excited about the next live session. |
Finkelstein, JE 2006, Learning in Real Time: Synchronous Teaching and Learning Online, John Wiley & Sons, Incorporated, Hoboken. Available from: ProQuest Ebook Central. [26 May 2020]. https://ebookcentral.proquest.com/lib/unisa/reader.action?ppg=83&docID=469387&tm=1540878658114#ppg=5
If you would like to ask questions about online teaching and learning related to your course, you can look through the Preparing for online exams website write to TIU@unisa.edu.au, have an online consultation with a member of the TIU.
PDF Version: Zoom Activity Ideas (184 KB)
Zoom or Panopto, which should you use for online teaching? They are both used to support learning at UniSA. They have similar features, but different strengths so they can be used to meet different needs when teaching online. In most cases, Zoom would replace tutorial/practical tasks and Panopto would be used as a lecture replacement.
Zoom is a meeting tool that provides video conferencing and screen sharing capabilities. Its features focus on interactivity and engagement during the meeting session itself. Zoom can record meetings to your local computer and to share the Zoom recording with your class, you will need to upload it to Panopto. Advanced features of Zoom include the ability to share applications, conduct polls and split the session into breakout rooms.
For further information and instructions, please see the Zoom help resource.
Panopto is designed for lecture capture, its features focus on creating a long-term, easy-to-view recording that integrates smoothly with learnonline. Panopto can record audio, webcam, PowerPoint slides, and the computer screen. Your recording will then be uploaded to the Panopto server and can be shared directly or embedded in learnonline. Captions are automatically generated. As viewers, students can take notes, search the video captions, place bookmarks, and comment on your recording. Advanced features of Panopto include the ability to conduct a prepared quiz during the display of a video.
For further information and instructions, please see the Panopto help resource.
|
Feature |
Zoom |
Panopto |
|
Interactive discussions |
Yes. Zoom is designed for interactive discussions |
Panopto is not designed for interactive discussions |
|
Easy sharing of recordings |
Upload a copy of your recorded Zoom session to Panopto |
Panopto recordings can be shared in learnonline or Panopto. |
|
Display |
|
|
|
User view |
Active speaker view (default) Gallery view, where all meeting participants visible simultaneously |
Students can view two sources (e.g. PPT/webcam). Users can choose which source is larger, or display a full screen of one source. |
|
Chat |
Each user can post a question or comment during the meeting to everyone in the meeting or to an individual participant. This chat conversation can be saved to the local computer when the meeting ends. |
|
|
Breakout rooms |
Yes, subgroups of students can work collaboratively at the same time. Teachers can move from room to room. |
No |
|
Mobile friendly |
Yes, download the Zoom mobile app. |
Yes, download the Panopto mobile app. |
|
Students can schedule and start study sessions |
Yes |
No |
|
Editable recording |
Recordings are editable once uploaded to Panopto |
Yes |
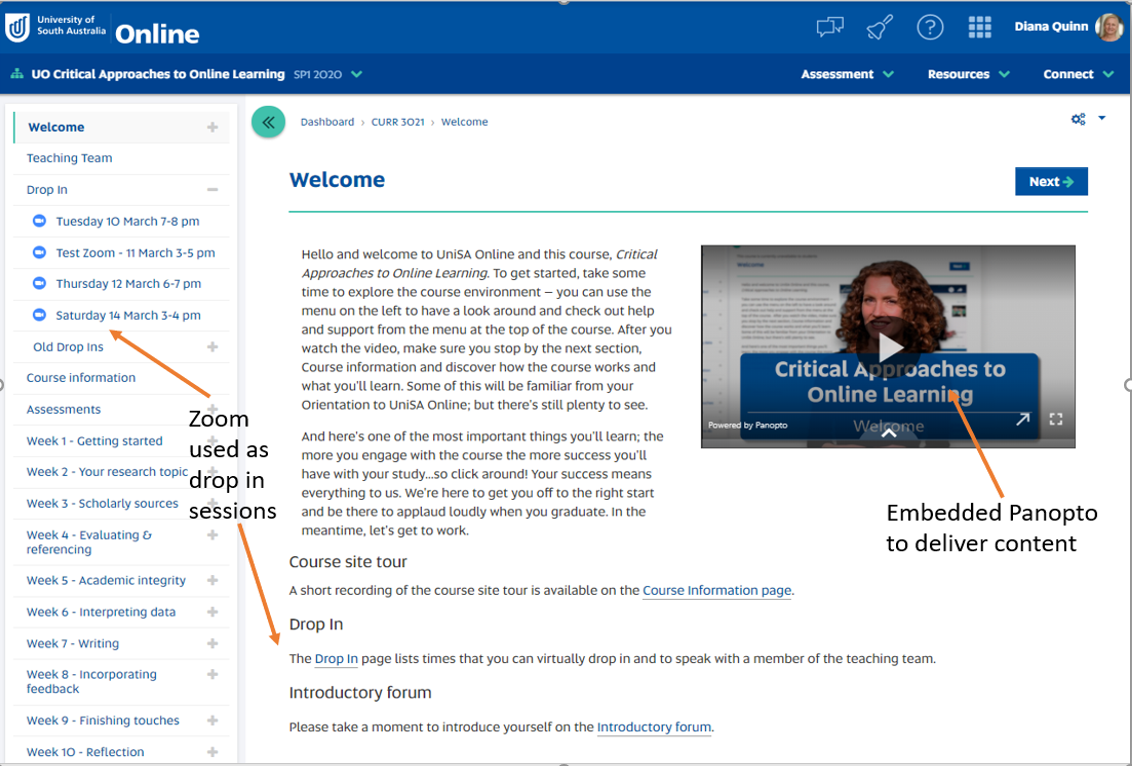
An example of how Zoom and Panopto have been used in the online course CURR 3021 which, as a staff member, you can explore.
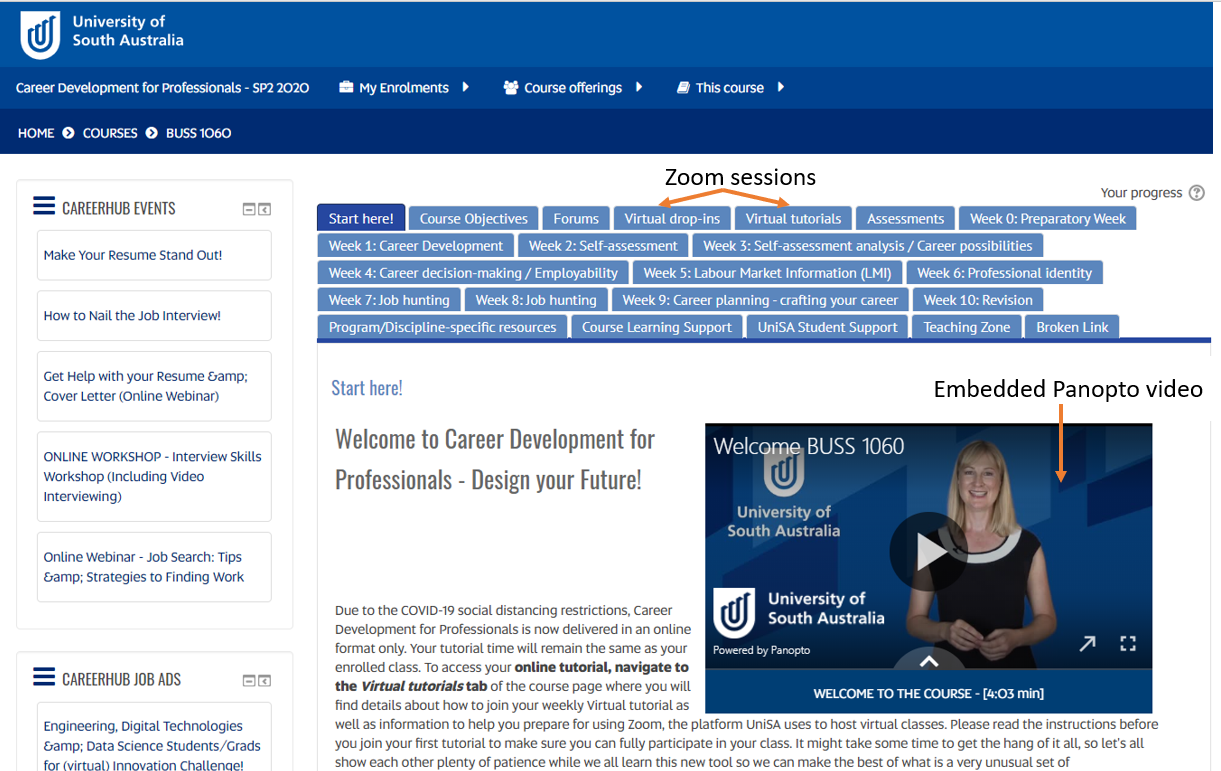
Another example of how Zoom and Panopto have been used in the online course BUSS 1060 which, as a staff member, you can explore.
Many online courses at UniSA have used YouTube in their websites to deliver content, rather than Panopto, as they had created these videos before UniSA had a licence with Panopto. Some of the reasons why it is preferable to use Panopto to deliver UniSA content now, rather than YouTube are:
Many online courses have adopted the use of Adobe Connect as a virtual classroom tool as UniSA previously supported this virtual classroom software. UniSA is now switching their support to Zoom rather than Adobe Connect because of licensing requirements which meant that only a certain number of staff could have Adobe Connect licenses. With our current license with Zoom, all staff and students have corporate licenses. The functionality of Zoom closely resembles the functionality of Adobe Connect, except for the use of layouts to organise pods. The ability for students to schedule, run and record their own online meetings in Zoom, to support their project work and to make recordings of presentations, is a powerful benefit for our students studying online.
If you would like to ask online teaching and learning questions related to your course, you can look through our FAQs, write to TIU@unisa.edu.au, have an online consultation with a member of the TIU, attend a Zoom workshop or sign up for the 1-week course, Introduction to Engaging Learners Online.
PDF Version: Zoom and Panopto (327 KB)

The Teaching and Innovation Unit offers a variety of options for professional development, including short courses and symposiums. Check out the calendar to find out what's on.

The Teaching Innovation Unit provides support to both academic and professional staff and offers a variety of helpful teaching resources.