Systems up or down


Webex Calls

Webex Calling allows you to call anyone and call other people within your organisation on their work number or mobile. Your call history is saved to your Webex application and it provides access to your voicemail.

You can make a call:

adio-video-call.png

  • By clicking the corresponding Audio button
    NOTE: May have the word Audio under the green icon, or may just be the green icon.


keypad.png

  • Click the keypad icon to open the Search or Dial options. Enter the desired number and then click Audio.

When you receive a call, a pop-up will appear on the bottom right corner of your screen.

Click Answer to answer the call or click Decline to decline the call and send the caller to your voicemail.

answer-call.png

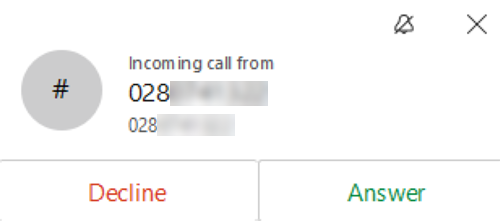
NOTE: When you answer a call, your video will be on by default. See below FAQ on how to turn this off.

You can change this setting, so your video does not activate when answering a call by:

  1. Click your profile image at the top left of your Webex application
  2. Selecting Settings
  3. Select Calling tab
  4. Uncheck Start calls with my video on option
  5. Click Save

Or for step-by-step instructions (including screenshots) see turn off Start calls with my video on page.

  1. Click the More icon (3 dots)
  2. Click Hold
  3. The caller will then hear hold music
  4. Click Resume to resume the call.

To transfer an active call:

  1. Click More (button with 3 dots)
  2. Click Transfer
  3. Enter the number of the call queue you wish to transfer the caller to
  4. Click Audio button to place the call
  5. Wait for the call to connect to the call queue
  6. Click Complete Transfer to transfer the call


Or for step-by-step instructions (including screenshots) see the transfer a call page.

  1. Click the More icon (3 dots)
  2. Click Add a person
  3. Enter the number you wish to conference with
  4. Click Audio button
  5. Wait for them to answer and inform them of the call (if you wish)
  6. Click Merge Calls to merge the calls and create a conference call with you and the 2 other callers

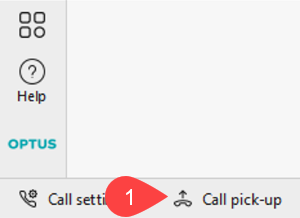
Call Pickup allows you to answer another user’s ringing extension.
NOTE: You will only be aware of another user's incoming calls if you can hear the sound from their PC. Webex does not indicate incoming calls to a Pickup group any other way.

To answer a call ringing on an extension number other than your own:

  1. Click Call pickup (bottom left corner)
    call-pick-up.png
  2. Click Pickup
  3. The call will then be redirected to you.
  4. Click Answer
  1. Go to https://settings.webex.com
  2. Select Webex Calling
  3. From the calling user portal, click Call Settings
  4. Toggle on Anonymous Call Rejection
  5. Click Save

 You can accept calls at specific times from specific callers.

  1. Go to https://settings.webex.com
  2. Select Webex Calling
  3. From the calling user portal, click Call Settings
  4. Toggle on Selectively Accept Calls
  5. Select a predefined schedule from the drop-down menu.
    NOTE: If you do not see a schedule you would like to use for this setting, you can add a schedule on the Schedules tab. For more information, see CIsco's Create a Schedule to Apply to Call Settings
  6. Click Add Schedule to set the following parameters:
    • When — Select your predefined schedule from the drop-down menu.
    • Calls from — Select if you would like to accept calls from Any Phone Number or Select Phone Numbers. If you choose Select Phone Numbers, enter the additional details.
    • Accept or Don't accept — Choose to accept or decline the calls that fit within these parameters.
  7. Click Save
    NOTE:
    Your schedule is added to an Accept or Don't Accept table. You can edit or delete schedules from the tables, as needed.
  8. Click Save

You can reject calls at specific times from specific callers. This setting will take precedence over Selectively Accept Calls.

  1. Go to https://settings.webex.com
  2. Select Webex Calling
  3. From the calling user portal, click Call Settings
  4. Toggle on Selectively Reject Calls
  5. Select a predefined schedule from the drop-down menu
    NOTE: If you do not see a schedule you would like to use for this setting, you can add a schedule on the Schedules tab. For more information, see Cisco's Create a Schedule to Apply to Call Settings
  6. Click Add Schedule to set the following parameters:
    • When — Select your predefined schedule from the drop-down menu.
    • Calls from — Select if you would like to accept calls from Any Phone Number, Forwarded, or Select Phone Numbers. If you choose Select Phone Numbers, enter the additional details.
    • Reject or Don't reject—Choose to reject or not to reject the calls that fit within these parameters.
  7. Click Save
    NOTE: Your schedule is added to an Accept or Don't Accept table. You can edit or delete schedules from the tables, as needed.
  8. Click Save


You can forward calls at specific times from specific callers. This setting takes precedence over call forwarding.

  1. Go to https://settings.webex.com
  2. Select Webex Calling
  3. From the calling user portal, click Call Settings
  4. Toggle on Selectively Forward Calls
  5. Enter the phone number to forward calls to
  6. Check the box next to Send to voicemail, to forward all calls to voicemail. The send-to-voicemail option is only available for internal phone numbers or exentions
  7. Check the box next to Use ring reminder, to enable a ring reminder for these calls
  8. Select a predefined schedule from the drop-down menu

    NOTE: If you do not see a schedule you would like to use for this setting, you can add a schedule on the Schedules tab. For more information, see CIsco's Create a Schedule to Apply to Call Settings.

  9. Click Add Schedule to set the following parameters:
  10. Forward to—Enter the phone number to forward calls to during this schedule
    • When — Select your predefined schedule from the drop-down menu.
    • Calls from — Select if you would like to accept calls from Any Phone Number or Select Phone Numbers. If you choose Select Phone Numbers, enter the additional details.
    • Forward or Don't forward—Choose whether or not to forward calls that fit within these parameters
  11. Click Save
    NOTE:
    Your schedule is added to an Accept or Don't Accept table. You can edit or delete schedules from the tables, as needed.
  12. Click Save

Clicking on the top right X doesn't close the application, but simply minimises it and the process continues to run in the background.

To complete close Webex, so you no longer receive incoming calls:

  1. Click the ^ at the bottom right of you screen, to the right of the time/date
  2. Right mouse click on Webex
  3. Click Exit

Or for step-by-step instructions (including screenshots) see exiting Webex page.

  1. Click Call Settings
  2. Click Notifications on left navigation
  3. Scroll to the bottom and choose more appropriate Ringtone from dropdown e.g., Class Ringer
  4. Click Save

Or for step-by-step instructions (including screen shots) see the changing ringtone page.

Did you know that you can adjust the ringer volume for your Webex Ringer? You may find it helpful to make a call to your UniSA extension (from a mobile) when following the below to adjust the volume to the required level.

  1. Click the search icon at the bottom left corner of your screen
  2. Search for Sound mixer options
  3. Scroll down to the WebEx ringer volume and drag the volume bar to the desired volume
    NOTE: There are two listing for Webex, one for Ringer and the other for Caller volume. Unfortunately, there is no set listing order and you will need to test to ensure you have adjusted the desired one.

Or for step-by-step instructions (including screen shots) see the changing ringtone volume page.

Dial Feature Notes/Steps
*11 Call Pull  
*31 Block Caller ID  
*32 Unblock Caller ID  
*33 Pick Up Someone Else's Call Enter *33, followed by the extension of the person whose call you want to pick up.
*48 Pause a Recording  
*49 Resume a Recording  
*50 Push-to-Talk You can use push-to-talk for intercom-like functionality to communicate with another user, or group of users. Enter *50, followed by a user's extension. Your phone will go offhook and an intercom- like call is placed.
An administrator must set up push-to-talk before you can
use it.
*55 Transfer a Call to Voicemail You can transfer a call to your voicemail or to another person's voicemail if they're in the same group. For example, to transfer a call to another person's voicemail, press the transfer soft key, then enter *55, followed by the person's extension.
*58 Group Call Park Enter *58, get a dial tone, and then enter the number for the group call park.
If you're using the Webex Calling app on your mobile device, the steps are slightly different: Tap New Call, go to your dialpad, enter *58#, and then press Call.
*66 Redial Last Number  
*68 Call Park Enter *68, followed by the extension at which you want to park the call or # to park the call on your own extension.
*69 Return Last Call  
*72 Call Forwarding Always Activation Enter *72, followed by the phone number you want to forward calls to and then #.
*73 Call Forwarding Always  
*78 Do Not Disturb Activation  
*79 Do Not Disturb Deactivation  
*88 Call Retrieve Enter *88, followed by the extension the call is parked at.
If the call is parked against your own extension, press #.
*97 Directed Call Pickup Enter *97, followed by the extension of the person whose call you want to pick up.
*98 Group Call Pickup  
*99 Clear Voice Message Waiting