Sharepoint document libraries can be synced with File Explorer and you can manage these Sync settings using the OneDrive client on your workstation. This allows you to drag and drop files into the Sharepoint library or directly access the documents via File Explorer.
The OneDrive sync client is now compatible with both OneDrive and SharePoint document libraries. This method replaces the unsupported SharePoint drive mapping method using Internet Explorer where you could view your Sharepoint library in the file explorer or 'my computer' on your workstation.
You have completed the sync of your SharePoint Document Library. Repeat the above steps for other document libraries you require to have available via File Explorer on your PC.
For step-by-step instructions (including screen shots) see How do I sync my Sharepoint files with OneDrive?
Once you have completed the sync of your Sharepoint Document library you will see the files displayed in your File Explorer. The Sharepoint Document library will appear on the left with the under the University of South Australia icon as shown here:![]()
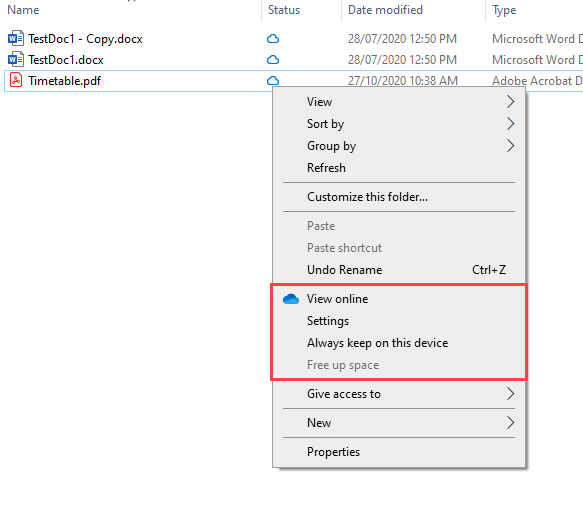
The content of the Sharepoint library are displayed as below. The default sync status is 'File on-demand' and appears s a blue cloud. This file is available when online and is not yet downloaded to your computer. When you open the file it will be downloaded and will display a different status icon.
The different file status categories are: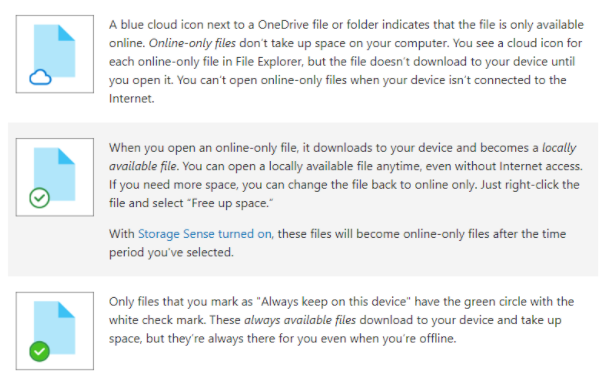
To make a file available for when you are offline right click on a file and choose 'always keep on this device' - you need to do this while online as a copy is downloaded to your workstation. You can reverse this setting by selecting 'Free up space' which sets the file back in 'Online only' mode.
To stop syncing your Sharepoint library:
For step-by-step instructions (including screenshots) see How do I stop syncing my files or folder?
To choose a particular set of folders from a Sharepoint library to sync first follow the steps to sync the Sharepoint library.
For step-by-step instructions (including screenshots) see How do I sync a folder within a library?
For step-by-step instructions (including screenshots) see Can I upload multiple files using Drag and Drop?
When you drag and drop files from one Sharepoint library to another you will lose the metadata - that is the information attached to the file such as who created the file and when it was created. If you wish to maintain the metadata, you can copy or move files using the method below.
Note: You cannot copy or move the entire library - only the contents of the library.
You will need edit permission on both the source and destination libraries.
For step-by-step instructions (including screen shots) see How can I move or copy content in Sharepoint and maintain metadata?