Systems up or down


Research Student Cisco Handsets

In common areas around UniSA campuses (eg Lecture Theatres, labs etc) there will either be a 6821 or 6851 Cisco IP Phone. Office locations there will be 8861 Cisco IP Phones.

Information on how to use the available models can be found in the following PDF guides:

When connecting your CISCO VoIP phone to the network, it is important to plug the ethernet cables into the correct ports on both the wall and the back of the phone device. Failure to follow these instructions can result in a non-working device and network issues for you.
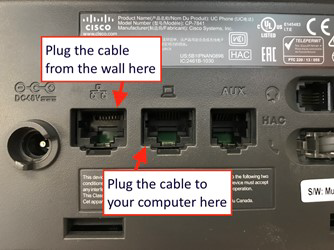
  1. Locate where the telephone connects to the wall port.
  2. Plug one end of an ethernet cable into this port, and the other end into the ethernet port on the back of the phone device.
    • The port is typically labelled with a symbol with three squares connected by a line and/or the words "LAN" or "Network.
      • Do not plug the cable from the wall into any other port on the phone
      • Do not plug more than one ethernet cable from the phone into a wall jack
        Back_of_Cisco_Phone.png
  3. The phone will power on if connected properly. Wait 15 minutes before using the handset.
  4. Confirm after 15 minutes the LCD display is showing correctly.
  5. Confirm you have dial tone and make/receive phone calls.
  6. If your computer is not already connected to the wired network, plug an ethernet cable from your computer to the PC port on the back of the phone.
    • This port is typically labelled with a laptop symbol or the word "PC" or "Computer".

NOTE: Before your phone is deployed to you the IT Help Desk will send out an email with your mailbox number and PIN.

  1. Dial 26700 from WebEx or 83026700 from any phone
  2. Press *
  3. Enter your mailbox number
    NOTE: If you do not know the mailbox number you will need to contact the IT Help Desk.
  4. Enter your PIN
    NOTE: If you do not know the PIN you will need to contact the IT Help Desk.

NOTE: Before your phone is deployed to you the IT Help Desk will send out an email with your mailbox number and PIN.

Accessing Voicemail options for Shared Extensions in WebEx

  1. Dial 26700 from WebEx or 83026700 from any phone
  2. Press *
  3. Enter your mailbox number
    NOTE: If you do not know the mailbox number you will need to contact the IT Help Desk.
  4. Enter your PIN
    NOTE: If you do not know the PIN you will need to contact the IT Help Desk.

Standard voicemail options

There are two standard voicemail greetings - one that plays if you don't pick up and one that plays if you are already on a call. These need to be recorded separately - the same recording can't be used for both instances. If you choose not to record a personalised message a default message will play.

Press 1 to access your voicemail box

  • Press 1 to listen to your messages
  • Press 2 to record a mailbox busy greeting (if you have your name recorded it will use that as a default busy greeting)
  • Press 3 to record mailbox no answer greeting (if you have your name recorded it will use that as a default busy greeting)
  • Press 4 to access the extended away greeting menu (see extended away greeting options below)
  • Press 5 to compose and send new message
  • Press 7 to delete all messages

Press 3 to go to the greetings Menu to record your name

  • Press 1 to record your name

Press 8 to change your passcode

Extended away greeting options

An additional voicemail option is the 'extended away'. When 'extended away' is activated your greeting is played after the first ring and the caller will not be able to leave a message. This prevents your voicemail box filling up during your absence.

An example where you might utilise an 'extended away greeting' could be, maternity leave or a career break.

You can call your voicemail portal either by dialing your business phone number or by pressing the message button, if applicable.

Proceed to enter your passcode, usually a 4-digit number followed by the pound (#) key. The prompt for the voicemail menu options will begin.

  • Press 1 to access your voice mailbox
  • Press 4 to access the Extended Away Greeting menu.
    • Press 3 to record your Extended Away Greeting. You will be prompted to record your message following the tone. Once finished, click on the pound key.
    • To activate your Extended Away Greeting, press 1.
  • Your Extended Away Greeting has now been activated.
    Note: To deactivate the Extended Away Greeting, repeat these steps. When prompted, press 2 to deactivate the Extended Away Greeting.

If a new physical telephone (with extension) or just an extension number is required please see the Telephone Work Request page. If HDR Student gets questions re handsets, they should be directed to their Research supervisor in the first instance.

NOTE: Telephone Work Requests (TWR) can be more complicated than they first seem as contractors or Network Services may need to install extra network hardware to complete your request. Please allow ample time for the completion of TWRs.