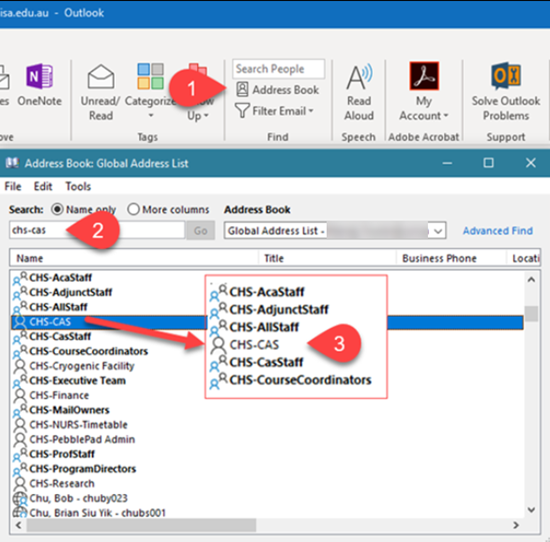
To determine if the email account is a Shared mailbox or a Distribution List (DL)

Step-by-step instructions (including screen shots) can be found on the Opening a Shared Mailbox in Outlook so sent items will go to that mailboxes sent items page.
NOTE: If you are using Outlook on macOS you will need to follow the Microsoft Open a Shared or Delegated Mailbox instructions..
Allows a user to send as another user or mailbox while showing the recipient that it was sent from one user on behalf of another. More commonly used for another staff member, than shared mailbox. Any replies to these emails will be sent directly to the staff member who the original was sent on behalf of.
Allows a user to send as another user or mailbox without showing the recipient who initiated the email.
To Send on Behalf or Send As:
NOTE: Staff email profiles are by default called UniSA Exchange. So if UniSA Exchange is listed to the right of From then the email will be sent from your staff email address.
NOTE: Staff email profiles are by default called UniSA Exchange. So if UniSA Exchange is listed to the right of From then the email will be sent from your staff email address.
Or step by step instructions (including screenshots) can be found on the 'Send on Behalf' or 'Send As' page.
The staff member you need to send emails on behalf of needs to grant you this permission through Delegate Access.
You need to contact the owner(s) of the Shared Mailbox.
NOTE: Internet Explorer 11 or FireFox are the recommended browsers for doing this.
For step by step instructions (including screenshots) see open Shared Mailbox through Outlook Web App (OWA) page.
NOTE: Internet Explorer 11 or FireFox are the recommended browsers for doing this.
Or for step by step instructions (including screenshots) see Putting Out of Office on through Outlook Web App (OWA) page.
To enable a redirection of ALL emails entering a mailbox to another specified mailbox follow the step-by-step instructions. These also cover how to setup an out of office reply to ALL emails entering a mailbox. This informs users of the updated email address. The instructions are complex so please read through first.
If you are not sure on any of the instructions, please contact the IT Help Desk.
Step-by-step instructions (including screen shots) on how to redirect all emails received by a Shared Mailbox page.
To copy content from one Shared mailbox to another you will need to have both Shared mailboxes added to your Outlook profile.
Then you can simply traverse to one Shared mailbox and drag and drop into the other.
For more information on adding a shared mailbox see Opening a Shared Mailbox in Outlook so sent items will go to that mailboxes sent items
Note: Prior to relocating the content from the OLD to NEW shared mailboxes, the Owner will need to review the mailbox permissions:
If you require assistance with any part of this process, contact IT Help Desk