IMPORTANT: The Self Service portal is no longer available to request IT support. Please raise all your IT support requests via the Services Hub or by calling IT on (08) 8302 5000.

While you are working from home you need to maintain the security and privacy of the University’s data by ensuring that no-one else in your household (or visitors to your household) can access or view University data.
Please review the IT Security information below to ensure you are keeping UniSA data and resources safe.
Or for step-by-step instructions (including screenshots) see the divert or forward calls page.
You will need to know this for a number of reasons e.g seeking IT Help Desk assistance, software installations etc:
You will need to know the Full Path of any Shared Drives you access e.g Teams/Staff-*/Research etc
If you frequently access websites such as SharePoint we strongly advise you to save them in your Staff Portal:
For step-by-step instructions (including screen shots) see creating a Staff Portal my Links page.
NOTE: If you forget to create these you will need to speak to a colleague. IT Help Desk does not have a list of websites people access.
Users will need to complete the Remote Desktop Access form to request access.
Ensure your Operating system is up to date.
Click on the Start menu and type 'Windows update'. Click on 'Check for updates'
Open the Apple menu select 'About this mac' and 'Software update'.
Windows 10/11 has it’s own anti-virus software, Windows Defender. This should be enabled if you are not using any other free or commercial anti-virus software.
The macOS is vulnerable to trojans and ransomware. To protect your computer antivirus software is recommended, such as Avast Security for Mac.
Panopto Recorder can be downloaded and installed directly through Panopto.
For step-by-step instructions (including screens shots) see the install Panopto Recorder page.
The software can be downloaded and installed directly onto your device through the Webex site.
On personal devices you can install Microsoft Teams by going to https://teams.microsoft.com/downloads
Zoom Client and other options can be downloaded through Zooms download center.
For additional information please see the installing Office365 page.
For step-by-step instructions (including screenshots) see install/update Adobe Creative Cloud Apps page.
NOTE: To use Outlook in the future you will need to connect to the VPN first, give the PC a minute or 2 after successful connection and then open Outlook.
NOTE: The following steps are for after you have installed Office365 and connected to the UniSA VPN.
For step-by-step instructions (including screenshots) see the adding staff email to Outlook on Mac page.
Step-by-step instructions (including screen shots) can be found on the Opening a Shared Mailbox in Outlook so sent items will go to that mailboxes sent items page.
NOTE: If you are using Outlook on macOS you will need to follow the Microsoft Open a Shared or Delegated Mailbox instructions..
NOTE: The following steps are for after you have installed Office365 and connected to the UniSA VPN.
Step-by-step instructions (including screenshots) see the adding shared mailbox to Outlook on Mac page.
For step-by-step instructions (including screenshots) see the install Windows f55 BigIP Edge Client page.
For step-by-step instructions (including screenshots) see the install macOS f5 BigIP Edge Client page.
For Windows computers you can use this Chrome break timer. If you are using Mac you can try Dejal time out.
The following PDF will assist you with disconnecting your computer, monitor and phone prior to moving
The following PDF will assist you with reconnecting your computer and monitor after a move
Whether this is a Blue Plated laptop or desktop, we recommend:
Please be advised that UniSA will not be providing staff with Wi-Fi dongles. If you wish to have this capability you will need to source this personally.
The following PDF will assist you with Docking Station to Monitor Connections when at home.
The following PDF will assist you with installing a Wireless USB adapter onto your UniSA computer.
Panopto Recorder is available through the Software Center.
NOTE: This is only possible if you are on campus or connected via VPN.
Panopto Recorder can be downloaded/installed directly through Panopto.
Or for step-by-step instructions (including screens shots) see the install Panopto Recorder page.
The PTC website has information on how working remotely can work for you, with useful resources such as tool kits - Your Wellbeing and Development and Managing Your Staff.
While working off campus you can use Microsoft Teams to keep engaged with colleagues via chat and audio/video calls for meetings.
Install the Teams app on your mobile phone, to make voice over IP calls to your colleagues.
See AskIT FAQ on how to use Teams
Please refer to login options under Install/Login section.
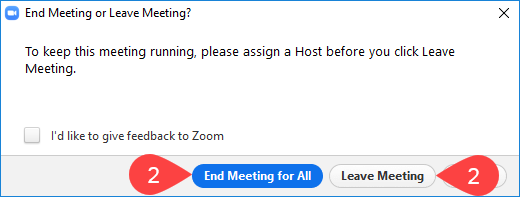
2. Click New Meeting
3. Click Join with Computer Audio
NOTE: You may also wish to tick Automatically join audio by computer when joining a meeting so you arent prompted again.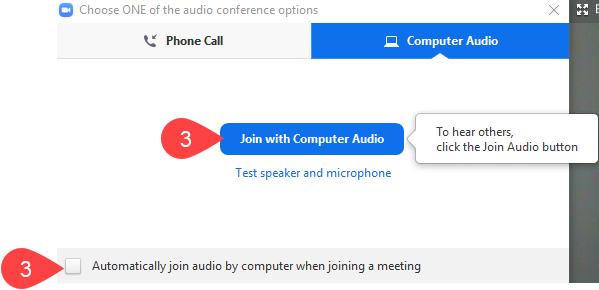
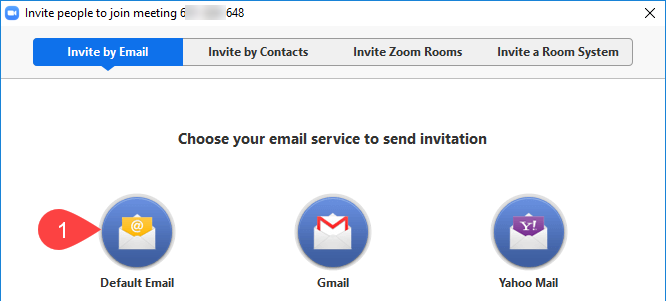
4. Click Invite and select desired method

5. Wait for Participants to join meeting and then proceed with meeting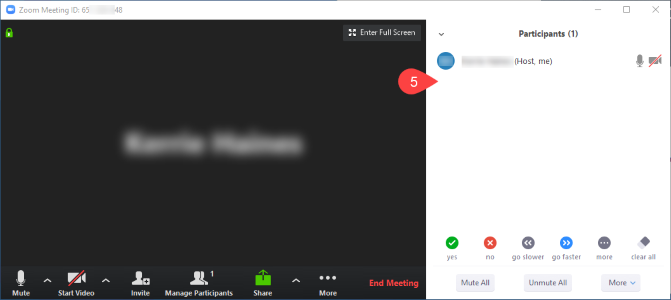
Please see the Zoom features section OR refer to section below.
Participants method of joining a Zoom meeting differs between course work virtual classroom session(s) and staff work meetings, but regardless of how hosts/participants join, once in a Zoom session the available features are identical. Which is why some of the below options will take you to a learnOnline help resource.
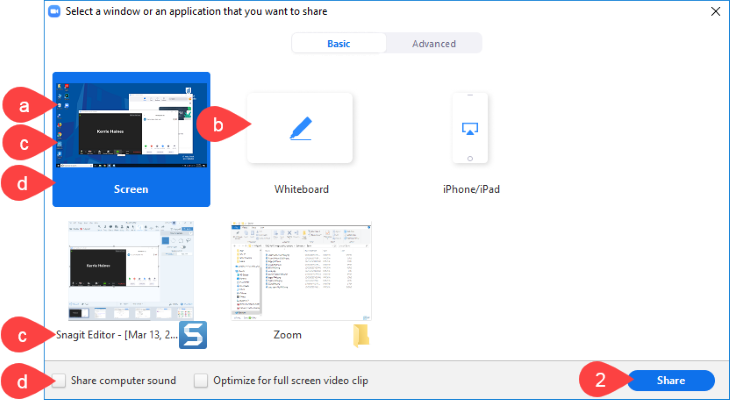
There are a number of options for hosts to share with participants, the most popular/common are:

Scheduling privilege is designed for a user or an executive admin to:
Steps on how to do this are available through the Zoom scheduling privileges page.
Please refer to Add a Co-Host page.
Did you know that you can delegate other people as alternative hosts in Zoom meetings?
If you have created a Zoom meeting but would like to add others to be capable of hosting the meeting in your absence (or automatically become co-hosts when you are there), then you can do this by adding them as “Alternative Hosts”.
This is especially important if, for instance, they need to record your meeting on your behalf.
To set up an Alternative Host, when scheduling a Zoom meeting follow these steps:
For more information on alternative hosts please click here.
Please refer to the Managing Participants page.
Please refer to the Breakout Rooms page.
Please refer to the Audio in Zoom page.
Please refer to the Accessing Zoom Recordings page.
Please refer to either the Sharing computer recordings or Managing and sharing cloud recordings pages.
The following settings will be default on UniSA Zoom conferences in order to improve security :
More information on Zoom Security can be found here.
An android smartphone can be used as a webcam for your PC by installing an app called 'DroidCam' on your phone. With the app installed and configured you can use it as a webcam for Zoom, Skype for Business and for recording video and audio for Panopto.
Follow these instructions to install and configure the app 'DroidCam' on your smartphone and connect it to your workstation.
Access to the OWA (Premium and Light versions) is via the Email link within myUniSA or by going directly to https://mail.unisa.edu.au/owa.
NOTE: Internet Explorer 11 or FireFox are the recommended browsers for doing this.
For step by step instructions (including screenshots) see open Shared Mailbox through Outlook Web App (OWA) page.
| UDFS User Share |
\\udfs.unisa.edu.au\staff-<USER_LETTER>\<USERNAME> |
| UDFS Team Share |
\\udfs.unisa.edu.au\teams\<SHARE_NAME> |
| RSFS User Share | \\staff.rsfs.unisa.edu.au\Staff-<USER_LETTER>\<USERNAME> |
| RSFS Group Share | \\groups.rsfs.unisa.edu.au\$\<GROUP_NAME> |
For step-by-step instructions (including screenshots) see Windows 10: mapping a network drive page.
| UDFS User Share |
smb://udfs.unisa.edu.au/Staff-<USER_LETTER>/<USERNAME> |
| UDFS Team Share |
smb://udfs.unisa.edu.au/teams/<SHARE_NAME> |
| RSFS User Share | smb://staff.rsfs.unisa.edu.au/Staff-<USER_LETTER>/<USERNAME> |
| RSFS Group Share | smb://groups.rsfs.unisa.edu.au/$/<GROUP_NAME> |
For step-by-step instructions (including screenshots) see Mac: mapping a network drive page.
Uploading files:
Or for step by step instructions (including screenshots) see upload file(s) page.
Share files immediately after uploading:
For step by step instructions (including screenshots) see sharing file immediately after successfully uploading page.
Sharing a file you previously uploaded:
For step by step instructions (including screenshots) see share a previously uploaded file page.
Further information on how to utilise OneDrive can be found in the upload and sharing section or downloading section.
You can view Bounced and Rejected Messages at any time using the Personal Portal.
After logging into the Mimecast Personal Portal click on Rejected Messages or Bounced Messages from the left hand menu.
These are messages have been sent to your email address that has been rejected or bounced because of the content or problems with the sending email servers. These generally applies to inbound emails.
The rejection or bounce viewer can be used to display information about why it was rejected it. If the message was legitimate, you can use this information to address the cause of the rejection or bounce.
NOTE: If you need to alter the Blocked list you can either use the Permit button (which moves the listing to the Permitted Senders list) or the Remove button which simply removes the block.
NOTE: If you need to change the Permission you can either use the Block button (which moves the listing to the Blocked Senders list) or the Remove button which simply removes the listing from the Permitted list.
For step by step instructions (including screenshots) see the connecting to UniSA VPN page.
For step-by-step instructions (including screenshots) see the install macOS f5 BigIP Edge Client page.
For step by step instructions (including screenshots) see the disconnecting from UniSA VPN page.
For step by step instructions (including screenshots) see the disconnecting from UniSA VPN page.
For step by step instructions (including screenshots) see the disconnecting from UniSA VPN page.
For step by step instructions (including screenshots) see the disconnecting from UniSA VPN page.
Working At Home Recommended Equipment:
The following will provide hardware recommendations for UniSA staff to facilitate working from home using a university supplied laptop.
The university supplied laptop will have a HDMI port capable of connecting to a HDMI compatible monitor. Once the monitor is connected to the laptop, adjustments to the display settings will be needed. To extend your desktop follow these steps by left clicking on the desktop >> Display Settings >> Scroll down to Multiple displays >> choose “extend desktop to this display” then moving the monitors under the “Rearrange your displays” area. If the monitor is not detected, please make sure you have selected HDMI as input in the menu function of the monitor.
The university supplied laptop has 1 or 2 USB ports (dependant on model) on the side of the device – these can be used to run a wired keyboard. If the keyboard supports it, connect the wired mouse to the USB port on the back of the keyboard. The other USB port can be used for a USB headset. Alternatively, you can connect a mouse only and use the inbuilt keyboard on the laptop.
The university supplied laptop will have inbuilt speakers and microphone for use in Webex, Zoom, Teams and any other video conferencing software. For video calls, you can use the integrated camera (on the inside of the lid).
The university does not purchase equipment for working at home. Docks for exclusive use at home should be purchased via Dell. If you have a Dell Model 54xx or 74xx Laptop we recommend (at a minimum) the D3100 Port Replicator. If you do have any questions a service call can be raised to check what equipment you have and what is recommended for your personal experience.
Purchase of a Dell P2422HE USB-C Hub Monitor (24” screen) is required for this set up (option to upscale to P2722HE – 27” screen)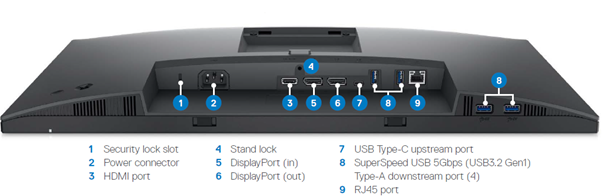
The university supplied laptop can connect to the 24” monitor using the USB-C port (port 7 on the diagram above). This device gives 4 additional USB ports, to allow for the use of addition peripherals such as wired keyboard, mouse, headset and webcam, with 1 to 2 USB ports (dependent on model) remaining on the laptop to be used for thumb drives or related USB devices. The USB-C cable will also provide charge for your laptop whilst connected (65w).
The monitor can support a 2nd screen using a HDMI cable (port 3 on diagram) or a DisplayPort cable (port 6 on diagram).
Purchase of a Dell D3100 USB 3.0 Port Replicator is required for this set up.
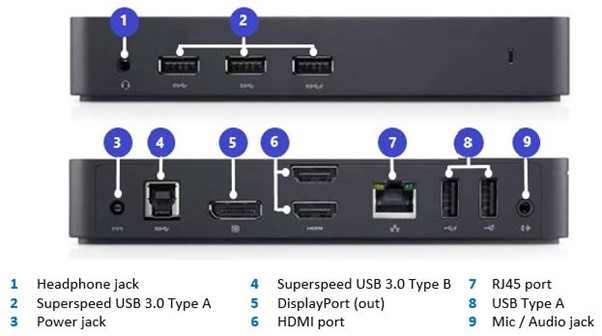
The university supplied laptop can connect to the D3100 dock using the supplied USB cable (Type A). This device gives 5 additional USB ports, to allow for the use of addition peripherals such as wired keyboard, mouse, headset and webcam. This dock does NOT provide charge to the laptop.
The device can be used to connect to external screens using the DisplayPort (port 5 on the diagram above) and/or HDMI (port 6 on the diagram above) ports.
The university will not purchase these items for you to use at home. It is expected that the user will purchase privately. This can be done via the dell website (Link will open in new window - www.dell.com/en-au). Please see here for more information on Personal Hardware Purchasing (Link will open in new window - Personal Purchases)
Purchase of a Dell U2422HE 24” USB-C Hub Monitor is required for this set up.
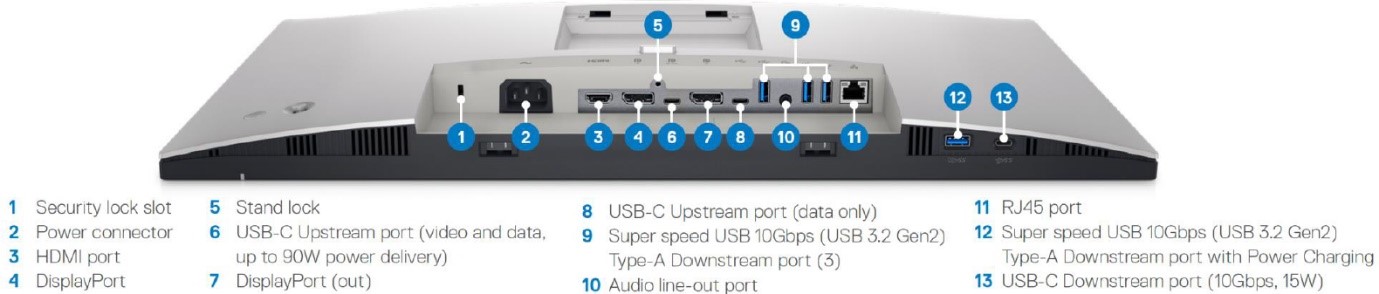
The university supplied laptop can connect to the 24” Ultrasharp monitor using the USB-C port (port 6 on the diagram above). This gives you 4 additional super speed 10Gbps USB ports, to allow for the use of addition peripherals such as wired keyboard, mouse, headset and webcam, and leaves you with 1 to 2 USB ports (dependent on model) on the laptop to be used for thumbdrives or related USB devices. The USB-C cable will also provide charge for your laptop whilst connected (90w), plus another USB-C port for data only.
The monitor can also support a 2nd screen using a HDMI cable (port 3 on diagram) or a DisplayPort cable (port 7 on diagram).
Purchase of a Dell U2722DE 27” USB-C Hub Monitor is required for this set up
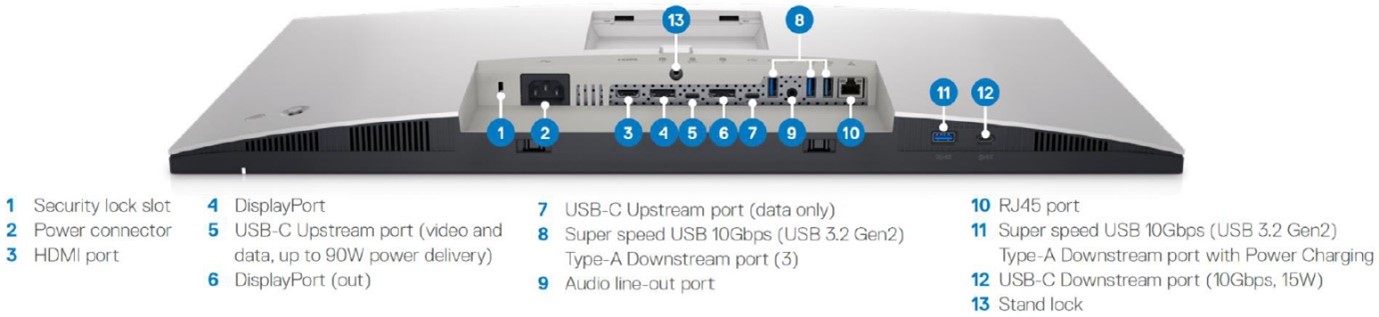
The university supplied laptop can connect to the 27” QHD monitor using the USB-C Port (port 5 on the diagram above). This gives you 4 additional super speed 10Gbps USB ports, allowing you to use wired keyboard, mouse, headset and webcam, and leaves you with 1 to 2 USB ports (dependent on model) on the laptop to be used for thumbdrives or related USB devices. The USB-C cable will also provide charge for your laptop whilst connected (90w), plus another 2 USB-C ports for data only.
The monitor can also support a 2nd screen using a HDMI cable (port 3 on diagram) or a DisplayPort cable (port 6 on diagram).
The university will not purchase these items for you to use at home. It is expected that the user will purchase privately. This can be done via the dell website (Link will open in new window - www.dell.com/en-au). Please see here for more information on Personal Hardware Purchasing (Link will open in new window - Personal Purchases)
The following will assist you with:
The following will assist you to/with:
The following will assist you with making them available to students:
This can be done through Panopto Recorder.
Other helpful pages can be found on the learnOnline Staff Help Panopto section.
The following will assist you with editing a Lecture Recording.
The following will assist you to embed a Video or Folder on your course site.
The following will assist you to embed readings into your course.
Always lock your computer when you step away from your computer and log off when you are no longer working.
Press the Window key and L to lock your screen
Press Command + Control + Q keys to lock your screen
On your home computer
Make sure you have a secure Wi-Fi connection.
To do this you need a strong password, as well as a strong security level on your router (modem).
Most Wi-Fi routers are correctly secured with WPA2 (Wi-Fi Protected Access 2), which is a method for securing your Wi-Fi network at home so that no one can access your information.
Depending on their data classification (see section 4.7 of the information security policy) files can be stored on UniSA approved cloud services such as One Drive, SharePoint, or server shares.
Files should not be stored locally on your computer or a USB drive.
Further information is available on our Protect your data .
Your UniSA computer is for your use only. Make sure that friends and family understand this and that they should not have access to this device.